Hello Sunshine Bobble Cardigan
My sweet nanny is going to be a grandmother for the first time this summer. Her daughter is not a fan of overly girly clothes or colors so I wanted to come up with a design that would be sweet and functional, but also fit her style. When my nanny showed me pictures of her “sunshine” themed baby shower, I became inspired to create this happy golden cardigan design. I’ve recently been obsessed with knitting bobbles, so I knew a fun bobble accent around the bottom of the cardigan would be the perfect amount of embellishment and also a great ode to the sunshine theme. While I knit this sweater for a baby girl, it would work equally well as a cardigan for boys or a unisex gift.
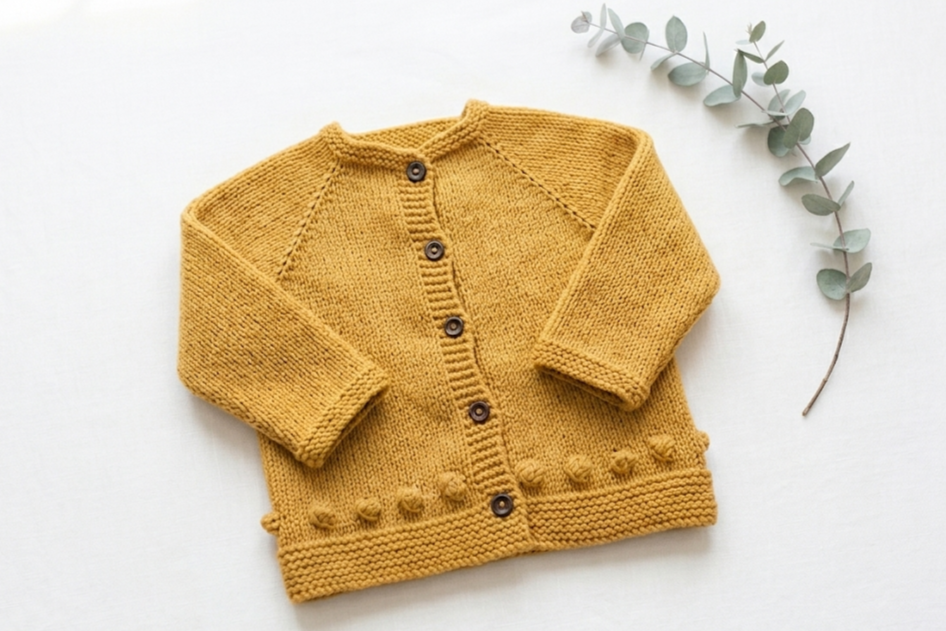
The Hello Sunshine Bobble Cardigan is knit from the top down, starting with the neck, raglan increase, body, and finally sleeves. The body of the sweater uses a simple stockinette stitch with a bobble and garter stitch border along the bottom edge. You can add personality to the sweater by finishing it with cute buttons. I chose to use Bernat Softee Cotton yarn, but if you live in a colder climate you could also substitute for a soft wool yarn of similar weight for an even warmer sweater.
The free pattern below is for size 6-12m. If you are looking for additional sizes, you can purchase an ad-free PDF of the pattern on my Etsy shop which includes instructions for 7 sizes from newborn - 4 years.
SPECIFICATIONS
SIZES
6-12 months: designed to fit chest chest 18”, actual cardigan chest is 21” around. Length = 11.5”; additional sizes newborn - 4 years available for purchase on my Etsy site.
GAUGE
22 sts and 30 rows to 4” in stockinette stitch on US size 6 needles
MATERIALS
Yarn: I used ~425 yds of Bernat Softee Cotton yarn in Golden; though you can also use any DK yarn of similar weight (3 - Lightweight)
Needles: US4 and US6 40” circular needle (for magic loop). If you prefer, you can use smaller circular or DPN for sleeves. I personally use the long circular needles to knit the entire project, but you can choose whatever works best for you.
Additional supplies: yarn needle, scissors, 4 stitch markers, 5 buttons - I used 1/2” wooden buttons from Michael’s; though any 1/2” - 5/8” buttons would work.
ABBREVIATIONS
co - cast on
k - knit
p - purl
k2tog - knit 2 together
kfb - knit in the front and the back of the same stitch; tutorial here.
ssk - slip slip knit
pm - place marker
sm - slip marker
tbl - through the back loop
RS - right side
WS - wrong side
MB - make bobble (tutorial here): On the right side (RS) of your work, knit to the point where you want the bobble, then…
Create 6 stitches: (Yarn over, knit into the same stitch) repeat this 3 times total without dropping the original stitch off the needle until the end. You will now have 6 stitches growing from one.
Build the height: Turn your work (Wrong Side): With yarn in front, slip the first stitch, then purl the next 5 stitches. Turn your work (Right Side): With yarn in back, slip the first stitch, then knit the next 5 stitches.
Decrease the Bobble: Turn your work (Wrong Side): Purl 2 together (P2tog) three times. You are now back to 3 stitches. Turn your work (Right Side): Slip 1 stitch purlwise, knit 2 together (K2tog), then pass the slipped stitch over the K2tog and off the needle. Give the yarn a good tug to tighten the bobble and finish knitting your row.
Finishing touch: Next Row (Wrong Side): Purl until you reach the bobble stitch. To make the bobble "pop" and stay tight, purl this stitch through the back loop (Ptbl)
INSTRUCTIONS
(A PDF of this pattern can also be found on Etsy for sizes 0m - 4y)
Note on buttonholes: Buttonholes need to be evenly placed along one garter stitch band as you knit the body of the cardigan. Suggested spacing: 5 buttonholes spaced ~2 3/8” apart. Note if you alter the length of your cardigan you will need to adjust the buttonhole spacing.
neck and raglan increase
Using 3.5mm (US size 4) straight needles loosely cast on 65 sts
Rows 1 - 4: Knit
Change to 4mm (US size 6) circular needle
R5 (RS): (Buttonhole Row):
For unisex or girl - Knit to last 4 sts, K2tog, yo, K2
For boy - K2, yo, K2tog, knit to end
R6 (WS): (Set Up Row) K5, purl 8, pm, purl 9, pm, purl 21, pm, purl 9, pm, purl 8, knit 5
R7 (RS): K5, *knit to 1st stitch before marker, kfb, sm, kfb*. Repeat from * to * 3 more times, knit to end (73 sts)
R8 (WS): and every alternate row: Knit 5, Purl to last 5 sts, slipping markers as you work, knit 5
R9: same as row 7 (81 sts)
R11: same as row 7 (89)
R13: same as row 7 (97)
R15: same as row 7 (105)
R17: same as row 7 (113)
R19: same as row 7 (121)
R21: same as row 7 (129)
R23: same as row 7 (137)
R25: same as row 7 (145)
R27: same as row 7 (153)
R29: same as row 7 (161)
R31: same as row 7 (169)
R33: same as row 7 (177)
R35: same as row 7 (185)
R37: same as row 7 (193)
R39: same as row 7 (201)
R41: same as row 7 (209)
R43: as row 7 (217)
Next Row: Knit 5, Purl to last 5 sts, slipping markers as you work, knit 5
** Don’t forget to work your buttonholes **
BODY
DIVIDE FOR BODY
Next row: Knit to 1st marker, remove marker, use a tapestry needle to slip the next 47 sts onto waste yarn, tie yarn to form a circle to secure, remove marker, knit to the next marker, remove marker, slip the next 47 sts onto waste yarn as before, remove marker, knit to end (123)
WORK THE BODY
Work the remainder of the body in stockinette stitch as follows:
R1 (WS): k5, purl to last 5 sts, k5
R2: k across
Repeat rows 1 and 2 -- remembering to work your buttonholes -- until your cardigan is about 2” shorter than the desired finished length ending on a WS row (~9.5”).
BOBBLE PATTERN
R1 (RS): K5, K2, *MB, K5* repeat from * to * until 7 sts remain in the row; K2, K5
R2 (WS): K5, purl across the row remembering to purl through the back loop when working the MB sts, K5
R3: K across
R4: K5, purl across, K5
R5: K across
GARTER EDGING
(Remember to work your buttonholes)
Change to 3.5mm (US size 4) needles; work 13 rows garter stitch, starting and finishing with a wrong side row. Cast off.
SLEEVES
With the right side of the work facing you and starting at the underarm edge, transfer the 47 sts from waste yarn for one sleeve evenly onto 4mm (US size 6) double pointed needles, or a small circular needle, or large circular needle for magic loop method - depending on your preference.
Place marker to denote the start of round.
R1-5: Knit
R6 (decrease round): k1, k2tog, knit to last 3 sts, ssk, k1 (45)
Continue to work in stockinette stitch (every round knit), working the decrease round every 7th round until you have 35 sts.
Continue in stockinette stitch without any more decreases until sleeve measures 6.25” from the underarm.
Change to 3.5mm (US size 4) needles. Work 5 rounds garter stitch. Cast off.
Finishing
Weave in loose ends. Sew up the small underarm gap under each sleeve. Attach buttons to button band, matching up with buttonholes.

***You may make and sell products from my patterns but if you do I ask that you link back to my post. Please do not copy and post this pattern and claim it as your own, or attempt to sell this pattern. Please do not re-publish photos as your own.