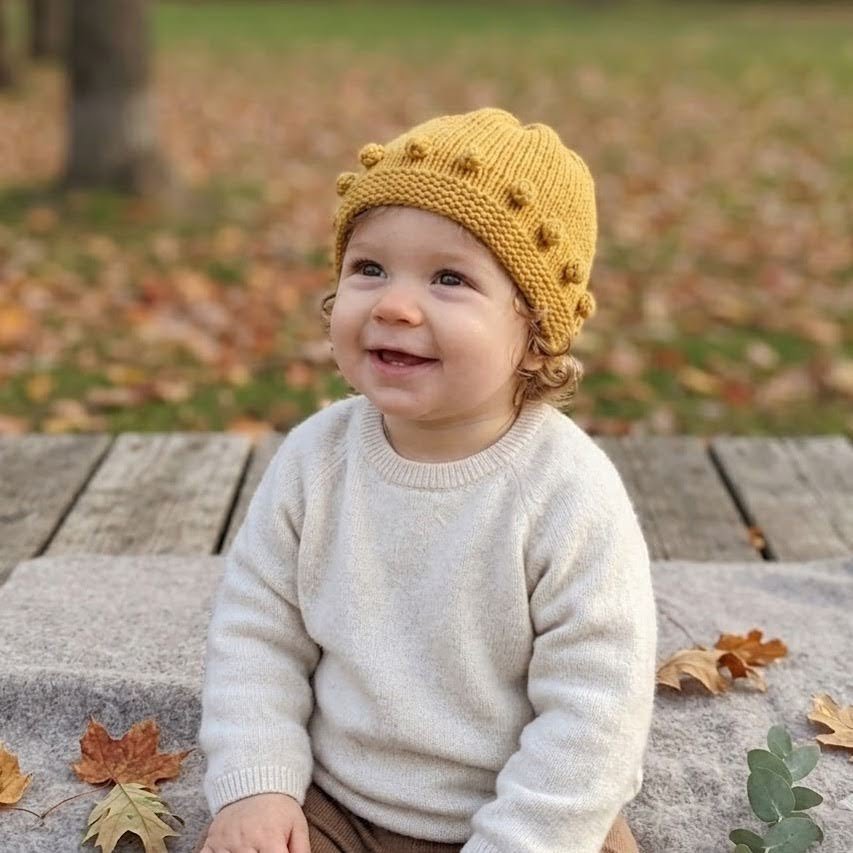
Hello Sunshine Bobble Beanie
I recently created the Hello Sunshine Bobble Cardigan for my sweet nanny’s first grandbaby. After making the cardigan I loved the bobble stitch so much that I just knew I needed to make a matching hat as well. I love this hat pattern because it is so versatile. I works for boys and girls and adults and children alike.
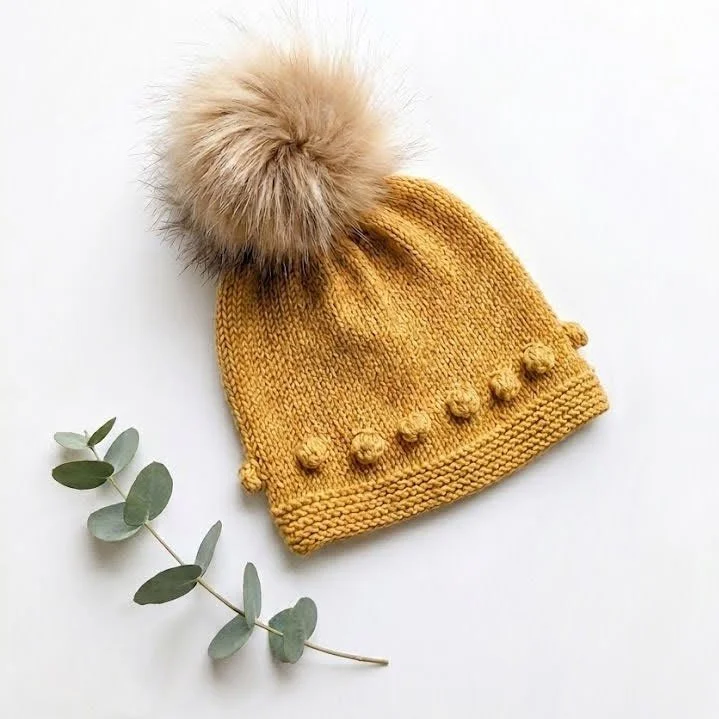
The Hello Sunshine Beanie is knit from the bottom up, starting with the garter stitch band, bobble stitch edging, body, and finally crown decreases. The design works for both girls and boys and is perfect for making matching family sets. You can also add personality to the hat by adding an optional removable pom pom.
The free pattern below is for size 6-12m. If you are looking for additional sizes, you can purchase an ad-free PDF of the pattern on my Etsy shop which includes instructions for 6 sizes from 0-6m to adult.
SPECIFICATIONS
SIZES
6-12 months: designed to fit head circumference 16-17”; lay flat width is 7.1” and beanie height should be 7.5”. Additional sizes for 0-6m through adult are available for purchase on my Etsy site.
GAUGE
22 sts and 30 rows to 4” in stockinette stitch on US size 6 needles
MATERIALS
Yarn: I used ~115 yds of Bernat Softee Cotton yarn in Golden; though you can also use any DK yarn of similar weight (3 - Lightweight)
Needles: US4 and US6 40” circular needle (for magic loop). If you prefer, you can use smaller circular or double pointed needles. I personally use the long circular needles to knit the entire project, but you can choose whatever works best for you.
Additional supplies: yarn needle, scissors, 8 stitch markers; optional: 1 0.5” button and pom pom
ABBREVIATIONS
co - cast on
k - knit
p - purl
k2tog - knit 2 together
ssk - slip slip knit
pm - place marker
sm - slip marker
tbl - through the back loop
MB - make bobble (tutorial here): On the right side (RS) of your work, knit to the point where you want the bobble, then…
Create 6 stitches: (Yarn over, knit into the same stitch) repeat this 3 times total without dropping the original stitch off the needle until the end. You will now have 6 stitches growing from one.
Build the height: Turn your work (Wrong Side): With yarn in front, slip the first stitch, then purl the next 5 stitches. Turn your work (Right Side): With yarn in back, slip the first stitch, then knit the next 5 stitches.
Decrease the Bobble: Turn your work (Wrong Side): Purl 2 together (P2tog) three times. You are now back to 3 stitches. Turn your work (Right Side): Slip 1 stitch purlwise, knit 2 together (K2tog), then pass the slipped stitch over the K2tog and off the needle. Give the yarn a good tug to tighten the bobble and finish knitting your row.
Finishing touch: Next Row: Knit until you reach the bobble stitch. To make the bobble "pop" and stay tight, Knit this stitch through the back loop (ktbl)
INSTRUCTIONS
(A PDF of this pattern can also be found on Etsy for sizes 0m - adult)
THE BRIM
Using US 4 (3.5mm) circular needles, cast on 78 stitches using the Long Tail Cast-on method. Join to work in the round, being careful not to twist your stitches. Place a marker to denote the start of the round.
Rnd 1: Purl all stitches.
Rnd 2: Knit all stitches.
Rnds 3-12: Repeat Rnds 1 and 2 until you have completed 6 garter ridges.
BODY
BOBBLES
Change to US 6 (4mm) circular needles.
Rnds 1-5: Knit all stitches (Stockinette).
Rnd 6 (Bobble Round): *K5, MB (Make Bobble)*; repeat from * to end of round.
Rnd 7: Knit all stitches. To keep bobbles tight, when you get to each bobble stitch, knit the bobble stitch through the back loop (Ktbl).
WORK THE BODY
Continue in stockinette stitch (knit every round) until the piece measures 6.25" from the cast on edge
Setup Round: On the very last round of the body, knit the following decrease round so that the resulting stitch count is a multiple of 8 and ready for the crown decreases: *k11, k2tog* repeat around (dec 6 to 72 sts)
CROWN DECREASE
Switch to DPNs or Magic Loop as the diameter narrows.
Setup Round: Knit 1 round, placing a stitch marker every 9 stitches. You will have 8 markers total (the start-of-round marker counts as your 8th).
Rnd 1 (Decrease): *Knit to 2 stitches before the marker, K2tog (Knit 2 together); repeat from * to the end of the round. (You have now decreased 8 stitches).
Rnd 2: Knit all stitches.
Repeat Rnds 1 and 2 until you have decreased to the point where there are only 5 stitches between each marker (40 stitches total).
Final Rnds: Now, perform the Decrease Round every single round (skipping the knit-only rounds) until you have only 1 stitch left between each marker (8 stitches total).
FINISHING
Cut the yarn: Leave a tail of about 8–10 inches.
Thread the tail: Use your tapestry (yarn) needle to thread the yarn tail through the remaining 8 stitches still on your knitting needles.
Remove the needles: Once the yarn is threaded through all 8 loops, slide your knitting needles out.
Cinch it closed: Pull the yarn tail tight, like a drawstring. This will bring those 8 stitches together into a neat, closed circle at the very center of the crown.
Reinforce: For extra durability (especially for baby hats that get washed frequently), I recommend threading the yarn tail through those final 8 stitches one more time before pushing the needle through the center hole to the inside of the hat.
Weave in ends: Turn the hat inside out. Weave the tail securely into the back of the stitches for about 2 inches, then snip the excess yarn. Do the same for the yarn tail at the cast-on edge (the brim).
OPTIONAL: ADD A POM POM
You may add any pom pom of your choosing. I like to make the pom pom removable, especially for baby hats that will be washed frequently. I do this by purchasing a pom pom that has a small rubber band attached; then I sew a button on the top inside of the hat (see picture). Thread the rubber through the center

Congratulations! You have now completed your Hello Sunshine Bobble Stitch Beanie.