Crocheted Easter Bunny

Nothing says springtime like a cute stuffed Easter Bunny! This will be my niece’s first Easter, so I wanted to make her a special bunny that was small enough that she could grasp it with her little hands, but also large enough that she would want to carry it with her for many Easters to come. I hope you enjoy the pattern.
MATERIALS
Crochet Hooks: G/4.00mm
Worsted weight yarn in tan, pink and white. I used Bernat Softee Baby yarn in pink and white, and leftover stash tan yarn that I had on hand in a similar weight. I also used a very small amount of black yarn for the eyes.
Poly-fil or other stuffing
Yarn or tapestry needle
Scissors
(Optional) pom-pom - or fork to create your own
ABBREVIATIONS
Ch = chain
Sl st = slip stitch
sc = single crochet
hdc = half double crochet
dc = double crochet
tr = treble crochet
BLO = back loop only
FLO = front loop only
scd = single crochet decrease; I use the crochet two stitches together decrease method
MR = magic ring - find a great tutorial here
BUNNY INSTRUCTIONS
SIZES
One size: the finished bunny is ~10” tall when standing
Bunny Head
Gauge: Using size G hook, gauge is 4 sts and 5 rows = 1” x 1”
The head is crocheted in continuous rounds as indicated below:
Rd 1: MR, 6 sc inside magic ring (6 sts)
Rd 2: *2 sc in first st, SC in next 2 sts* repeat from * (8 sts)
Rd 3: *2 sc in first st, SC in next 3 sts* repeat from * to end of round (10 sts)
Rd 4: *2 sc in first st, SC in next 4* repeat from * to end of round (12 sts)
Rd 5: *2 sc in first st, SC in next 3* repeat from * to end of round (15 sts)
Rd 6: SC in next 3 sts, *2 sc in next st, SC in next* repeat from * to * 3 more times, then 2 sc in next, SC in final 3 sts (20 sts)
Rd 7: SC in next 5 sts, *2 sc in next st, SC in next* repeat from * to * 4 more times, then SC in next 5 sts (25 sts)
Rd 8: SC in next 6 sts, *2 sc in next st, SC in next 2* repeat from * to * 3 more times, 2 sc in next, then SC in final 6 sts (30 sts)
Rd 9: sc in each st around
Rd 10: sc 10, *2 sc in next st, sc 2* repeat from * to * two more times, 2 sc in next, SC 10 (34 sts)
Rd 11: sc 11, 2 sc in next st, sc 10, 2 sc in next st, sc 11 (36 sts)
Rd 12-16: sc in each st around
Begin decrease as indicated below. Stuff the head as you go so it’s firm to the touch.
Rd 13: *Scd, SC in next 4* repeat to end of round (30)
Rd 14: *Scd, SC in next 3* repeat to end of round (24)
Rd 15: *Scd, SC in next 2* repeat to end of round (18)
Rd 16: *Scd, SC in next 1* repeat to end of round (12)
Rd 17: Scd, repeat to end of round (6)
With yarn needle, cut long tail then weave through remaining 6 sts, pull tight to close, bind off, weave in ends.
Ears
(make 2 using tan yarn and 2 using pink yarn)

Ch5, turn
Row 1: Sc in second ch from hook, SC to end (4 sts)
Row 2-4: Sc across, ch1, turn
Row 5: 2sc, SC, SC, 2sc, ch1, turn (6)
Row 6-10: SC across, ch1, turn
Row 11: 2sc, SC in next 4, 2sc, ch1, turn (8)
Row 12-17: sc across, ch1, turn (8)
Row 18: scd, SC in next 4, scd, ch1, turn (6)
Row 19: SC across, ch1, turn
Row 20: scd, SC in next 2, scd, ch1, turn (4)
Row 21: SC across, ch1, turn
Row 22: scd, scd (2)
Bind off
Take one ear from pink yarn and one ear from tan yarn and hold them together, then using a long strand of tan crochet the two pieces together by sc around the entire perimeter of the ear. Leave a long tail to attach attach the ear to the head.
Repeat the process above with the other pink and tan ear that you made.
Bunny Body
Similar to the bunny head, the bunny body is crocheted in continuous rounds
Rd 1: Mr 6, do not join, prepare to continue in spiral
Rd 2: 2 sc in each around (12 sts)
Rd 3: *2 sc, SC* repeat around (18)
Rd 4: *2 sc, SC in next 2* repeat around (24)
Rd 5: *2 sc, SC in next 3* repeat around (30)
Rd 6: *2 sc, SC in next 4* repeat around (36)
Rd 7: SC in each around
Rd 8: *2 sc, SC in next 11* repeat around (39)
Rd 9 - 20: SC in each around
Begin decrease as indicated below. Stuff the body as you go so it is firm to the touch.
Rd 21: *scd, SC in next 11* repeat around (36)
Rd 22: SC in each around
Rd 23: *scd, SC in next 4* repeat around (30)
Rd 24: SC in each around
Rd 25: *scd, SC in next 3* repeat around (24)
Rd 26: SC in each around
Rd 27: *scd, SC in next 2* repeat around (18)
Rd 28: *scd, SC in next 1* repeat around (12)
Rd 29: *scd* repeat around (6), sl st in 1st St of round, bind off leaving long tail to sew body onto head.
Arms
(make 2, stuffing the arms as you go)
Rd 1: MR, 6 sc in magic ring; do not join, prepare to continue in spiral
Rd 2: 2 sc in each around (12 sts)
Rd 3: *2 sc, SC in next 2* repeat around (16)
Rd 4-7: SC in each around
Rd 8: scd, scd, scd, SC in next 10 (13)
Rd 9-16: SC around
Rd 17: SC, SC, scd, SC in remaining sts around (12)
Rd 18-21: SC around
Rd: 22: *scd, SC* repeat around (8)
Rd 23: SC around
Pinch flat and stitch across the top, stitching the two sides together (see picture). Bind off, leave long tail to stitch onto bunny body.


Legs
(make 2, stuffing the legs as you go)

Rd 1: In white yarn, Mr 6, do not join, prepare to continue in spiral
Rd 2: 2 sc in each around (12 sts)
Rd 3: *2 sc, SC in next* repeat around (18)
Rd 4: *2 sc, SC in next 2* repeat around (24)
Rd 5-6: sc in each around
Rd 7: change to tan yarn, sl st in first st of round then SC in each st around
Rd 8-10: SC in each around
Rd 11: scd 4 times, SC in remaining 16 sts around (20)
Rd 12: scd twice, SC in remaining 16 sts around (18)
Rd 13-24: SC in each around
Rd 25: *SC in next 4, scd* repeat around (15)
Rd 26: SC in each around
Rd 27: *SC in next 3, scd* repeat around (12)
Rd 28-29: SC in each around, sl st into first st of round; bind off leaving long tail.
Using long tail and yarn needle, seam top of leg together so seam points between middle of foot. See photo.
Bunny Assembly
Sew face onto head: using scrap amounts of black yarn and darning needle, stitch eyes in place as shown in the photo. Then using one strand of white yarn, sew the pupil of the eye in place. Using pink yarn, sew the nose in place as shown in the photo.
Sew ears onto head: using long tail of tan yarn, stitch the ears in place on the head. The front of the ear should line up with ~row 10 of the head. Repeat with second ear, placing ears about 8 stitches apart.
Attach the arms to the body: using long tail of tan yarn on the arm and a darning needle, stitch the arms onto the body as shown in the photo. Repeat with the second arm.
Attach the head to the body: using the long tail of yarn from the body, use the darning needle to attach the head to the body.
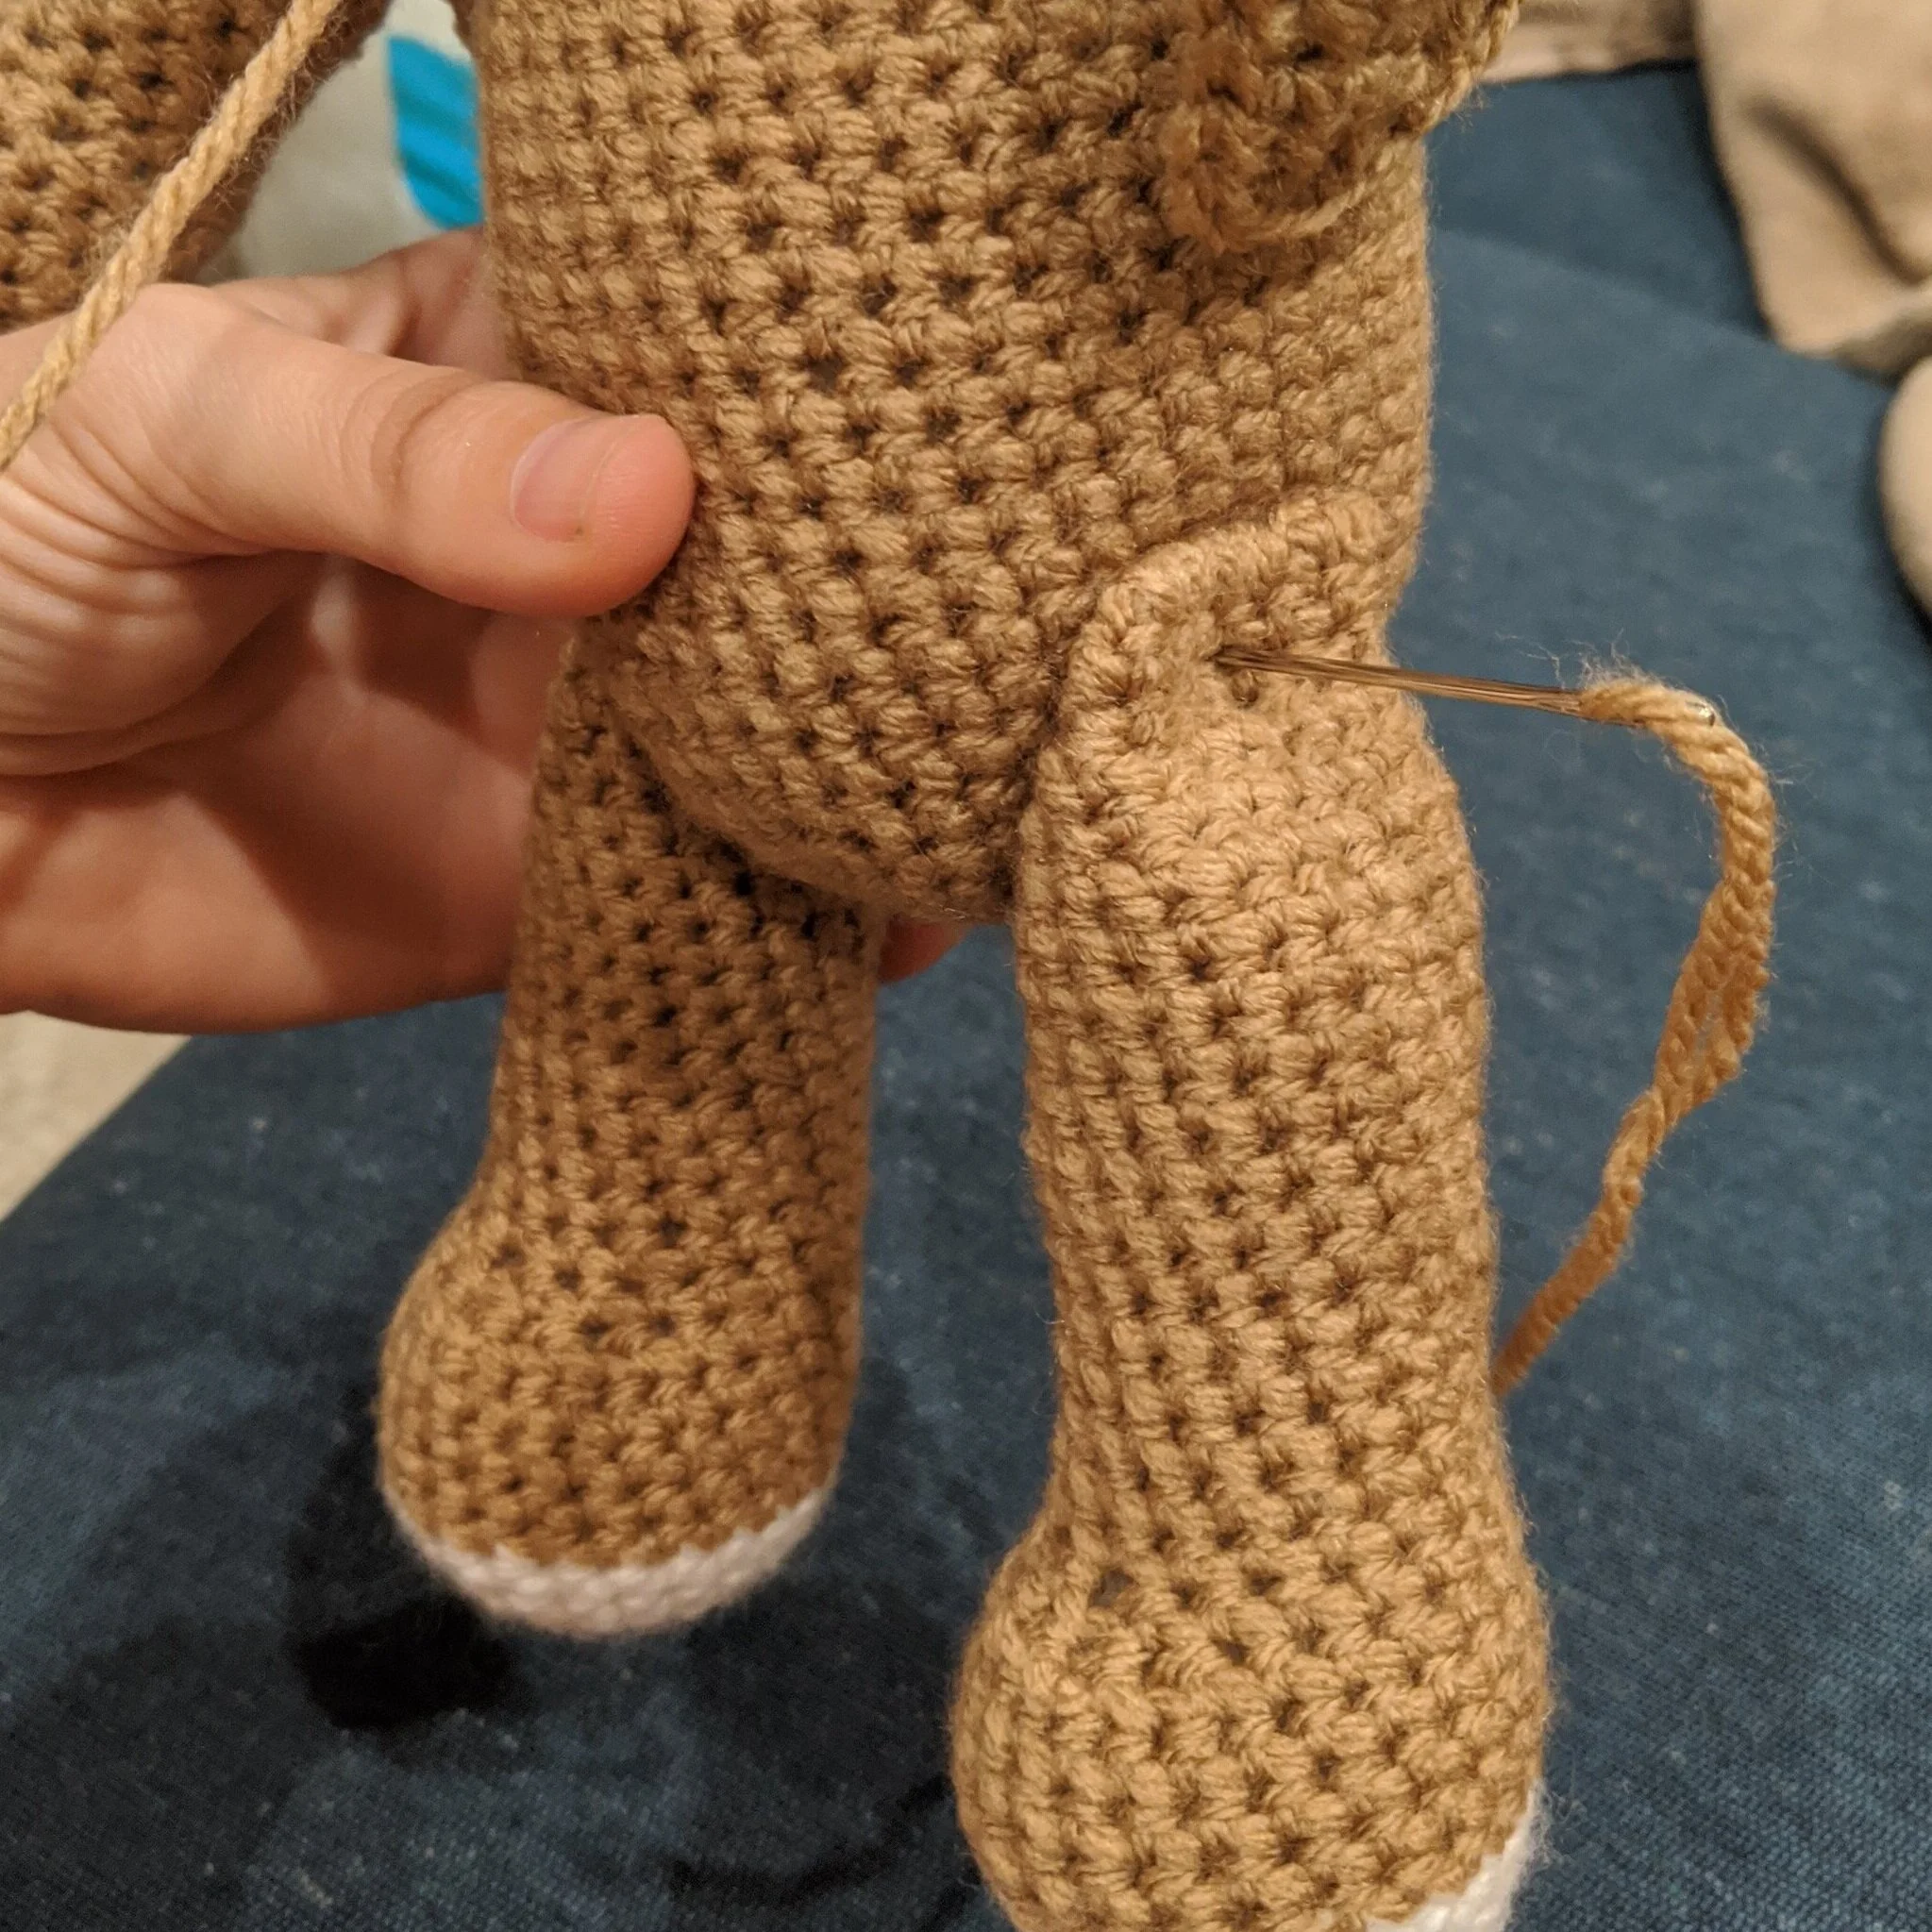
Attach the legs: hold both legs against the sides of the body lining up the top of the leg with ~row 11 of the body. Using a long piece of tan yarn and darning needle, insert the needle through the top of the left leg then pass through the entire body coming out the other side and through the right leg on the other side. Pull tight then repeat in the other direction: enter through the right leg, pass through the entire body then come out the other side through the left leg. Pull tight. Repeat this process a few more times until the legs are securely attached. Tie off, weave in ends.
Note: the reason that we attach the legs in this manner is so that the legs can swivel and move freely from standing position to seated position.


Pom-pom tail (optional)

For the tail, you can use a pre-made pom pom in white, or create your own. To create your own:
Step 1: simply wrap white yarn around a fork multiple times until desired thickness is achieved.
Step 2: Next tie around the middle as indicated in the photo.
Step 3: After the tie is in place, slip the yarn off of the fork. At this point, it should look like a bow with the tie in the middle and loops of yarn on either side of the tie.
Step 4: Insert your scissors through one set of loop and cut through the middle of the loops. Repeat this process cutting the loops on the other side as well.
At this point you will have created a pom-pom. Using white thread to attach the pom-pom to the body in the place where a tail would be - middle of pom pom should line up with ~row 11 of the body.

***You may make and sell products from my patterns but if you do I ask that you link back to my post. Please do not copy and post this pattern and claim it as your own, or attempt to sell this pattern. Please do not re-publish photos as your own.